The death of King Edward the Confessor in January 1066 triggered a major succession crisis. With no direct heirs, the English crown went to Earl Harold Godwinson, the king’s brother-in-law. This angered Duke William of Normandy, who claimed that Harold had sworn an oath of loyalty to help him secure the throne. The situation was aggravated by King Harald Hardrada of Norway, who claimed the English throne with support from Harold’s exiled brother Tostig.
While Harold kept his army along the southern coast of England, Hardrada and Tostig invaded the north in September. Harold was able to defeat them at Stamford Bridge, but his victory was short-lived; in early-October, he was informed that William had landed in Sussex with about 8,000 Norman, French, Flemish, and Breton troops. The exhausted Anglo-Saxons now had to march all the way south, stopping only for a few days before taking position on a hilltop about seven miles from Hastings.
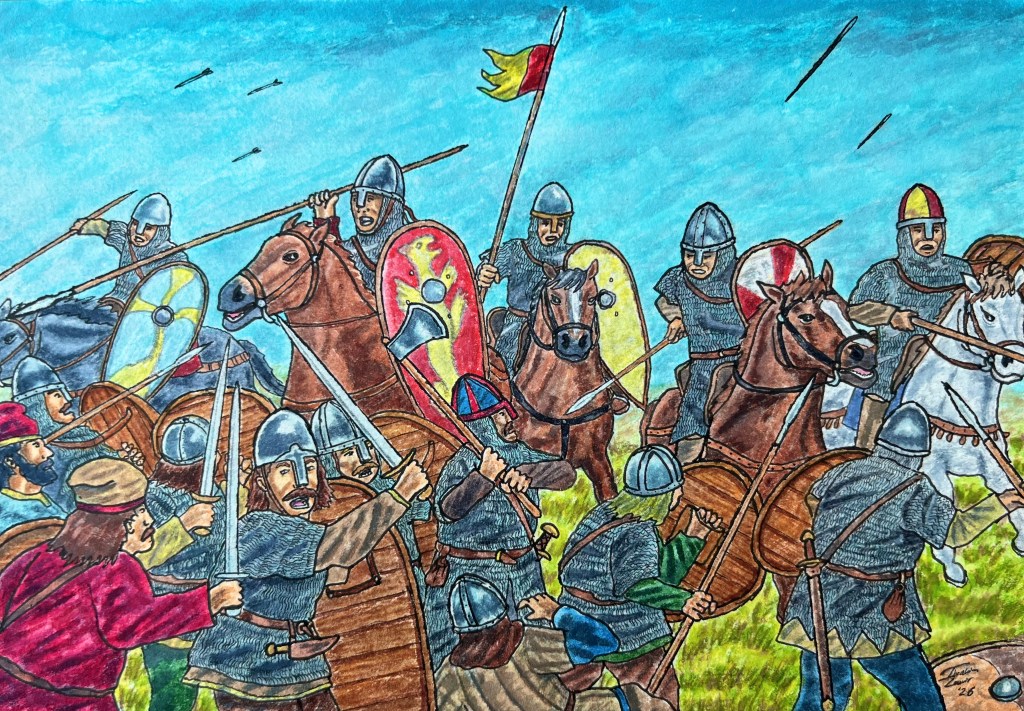
The battle began at around 09.00hrs with a barrage of Norman and French arrows. Unable to outflank Harold’s position due to thick undergrowth and woods, William had no choice but to launch an uphill frontal assault. After a fierce hand-to-hand struggle, the Duke then sent in his cavalry – elite knights mounted on expensive warhorses – to break the defence.
Here we see the Norman knights approach the Anglo-Saxon troops, who have formed a ‘shield wall’ of overlapping shields. This formation would have been made up of well-equipped huscarles and thegns in front, followed by poorer fyrd levies in the rear. Although it formed a strong defence against arrows and horses, the ‘wall’ would have loosened during close-quarters combat. The broad-headed spear was the primary weapon, but one or two-handed axes were also popular; the sword was a last-resort, but could be used if the shield wall was too crowded.
Norman cavalry fought in conroi squadrons, led by a commander carrying a small gonfanon flag attached to a lance. Although they were well-equipped with mail armour and kite-shaped shields, the knights were hampered by the uphill slope and lack of space. Once they approached the shield wall, they faced a dense hedge of axes and spears that inflicted heavy losses.
By early-afternoon, the Normans were on the verge of collapse as the Anglo-Saxons held firm. The cavalry could not achieve a breakthrough, but enjoyed greater success drawing out the defenders, wheeling back round and cutting through them. These ‘feigned retreats’ helped to thin the ranks of the shield wall, providing William a chance to launch one last assault. As the Anglo-Saxon line began to falter, Harold was killed – most likely by Norman cavalry – and his banner was captured. William had achieved a decisive victory, demonstrating the superiority of his mixed cavalry-infantry tactics and paving the way for a full-scale ‘Norman Conquest’.
Sources
English Heritage, ‘What Happened at the Battle of Hastings?’ no date (https://www.english-heritage.org.uk/visit/places/1066-battle-of-hastings-abbey-and-battlefield/history-and-stories/what-happened-battle-hastings/, accessed 20th Oct 2026).
Gravett, Christopher. Hastings 1066: The Fall of Saxon England. Oxford, England: Osprey Publishing, 1992.
Gravett, Christopher. Norman Knight AD 950 – 1204. Oxford, England: Osprey Publishing, 1993.
Harrison, Mark. Anglo-Saxon Thegn AD 449-1066. Oxford, England: Osprey Publishing, 1993.
Nicolle, David. The Normans. Oxford, England: Osprey Publishing, 1987.
By Ibrahim Zamir

